Monday, April 27, 2009

First Bottling Day - oh yea!!

Date - November 25, 2007

So, four weeks in and I'm one more step to finishing my first beer!!

I don't remember too much from my first bottling experience, except for being obsessed with sanitizing. This seems to be the step where if you're not careful, you can ruin a whole batch of beer in no time.

A dishwasher here is very handy and in fact, bottling beer is the only time I use mine!! In general I use 22-oz. bombers to cut down on the amount of capping, but more and more I use 12-oz. bottles to allow for easier testing during the carbonation phase.

All in all my first day of bottling was quite smooth. Took me about 1.75 hours from start to finish and no major issues to report. That won't always bee the case...haha.

So, three weeks to carbonate - can I wait that long???

My general bottling procedure:
  1. Sanitize dishwasher
  2. Sanitize bottles - soak in bath of sanitized water; drip dry in dishwasher
  3. Sanitize bottle caps and small rack for drying
  4. Sanitize siphon, tubing, sample tube, bottling bucket, filler
  5. Let everything have a little time to dry
  6. Boil 5 oz. of corn sugar in 1 pint of water for ~ 10 mins.
  7. Dump sugar in bottling bucket
  8. Siphon beer into bottling bucket
  9. Fill bottles
  10. Cap bottles
  11. Clean up and label caps


Sanitized bottles drying in my dishwasher


Getting ready to fill them up


Red Barron Capper


Two cases of beer!!!!


Sample and hydrometer

Transfer Batch No. 2

Date - November 23, 2007

The SnoPack Porter transfer was typical. Less hops resulted in less trub. Krausen never got as big, so less clean up on the primary. That might also be evidence of not enough fermentation as my attenuiation on this batach ended up quite low (55.6%).

*As time went on I took less and less photos of each brew day, but figured I share most of my earlier ones.


Second Brew Day - Full Boil

Date - November 10, 2007

The big change for batch #2 was obviously moving up to a full boil and using my new wort chiller. Not much was different from the first day and I was much more comfortable with the process, equipment, etc. This also marked my first porter, which has long been my favorite beer style.

But wow, what a long brew day compared to the first. Heating up 5+ gallons on your stove takes some serious time. On later batches I brewed with the oven on, but not sure how much that really helps.

The chiller worked pretty well; cooling the wort in about 30 minutes. Pretty good, but not that great and room for improvement. I did haven't nearly enough ice, so will stock up more next time. To sanitize the cooper, place the chiller directly into the wort during the last 10-15 minutes of the boil.


5+ gallons of boiling wort


Getting ready as the boiling nears completion


Chiller in at the end of the boil to sanitize


Chiller in and running


Finished w/ sample; nicely aerated

Batch No. 2 - SnoPack Porter

SnoPack Porter

Brewed - November 10, 2007

Style - Porter
Source - Northern Brewer Kit (St. Paul Porter)

Ingredients:
  • 6.0 lbs. Dark LME
  • 1.0 lbs Dark DME
  • 0.5 lbs. Simpson's Chocolate
  • 0.5 lbs. Simpson's Dark Crystal
  • 1.0 oz. Chinook (60)
  • 1.0 oz. Cascade (1)
  • Wyeast #1187 Ringwood Ale
OG - 1.054
Primary - 13 days
Secondary - 16 days

Bottled - December 9, 2007

FG - 1.024
Attenuation - 55.6%
ABV - 3.9%

Notes:
- first time doing a full boil (5.5 gals. at start)
- took 100 mins. to get that much water boiling
- took 30 mins. to chill via wort chiller
- need more ice next time
- took over 8 hours w/ extended boiling time!!!

Sunday, April 26, 2009

Home-made Wort Chiller

After my first batch, I decided to go ahead and do full boils. I had originally purchased a big, 8 gallon kettle with thoughts of future needs and the more I read, the more I was convinced that if you have the capability, you should do a full boil.

The only caveat here would be that I'm what is known as a "stovetop" brewer. I life in a condo in downtown Seattle, so I don't have an outdoor area or garage where I can set up a propane burner and instead brew in my kitchen and on my stove (electric range at that). So, I was soon to learn how long it takes to heat up 5 gallons of water.

But the first issue was how to cool 5 gallons of boiling wort, which is very susceptible to infection in between the boiling stage and pitching the yeast at 70°. With my first batch, I placed the kettle in a ice water bath and that even took more than 30 minutes to cool only 1.5 gallons. The only option would be a wort chiller. I had seen many online, but felt reasonably confident that I could make my own for cheaper. Plus it would be a fun project.

Material:
  1. 50' Copper Tubing - 1/4" inner diameter (25' would have worked)
  2. Plastic Tubing
  3. 2 small clamps
  4. Beckett M250 Fountain Pump (257 gph)
Total cost was about $60 (including the pump). Copper was pretty pricey at the time and ones made with 25' of copper tubing were about $50 at the hombrew supply sites.

Some that I saw online were soldered together for added stability. After I shapped the coil around a small bucket, I brought the ends up from the bottom (along the inside). This worked out to help stabilize it and acts as a handle for lifting in and out of the wort. It may not be much to look at, but works like a charm.

For people who brew outside, you can force the water through the copper using a hose and the same can be done inside using an attachment for your sink. I live in an old building where water pressure isn't the best, so I'm not sure where I first saw the idea for a fountain pump, but it is a great idea and works perfect for me. I first picked up one with was 150 gph (gallons per hour), but it was way too weak.

One of the concerns I always have with brewing is the amount of water used throughout the process. I start with a bucket of ice water and pump it through the copper. As expected, it is very hot when it first comes out. But after about 7 minutes, the water is cool enough to recycle into the ice water bath.

In general I'm able to cool 5 gallons of boiling wort to 70° in approximately 15 minutes.


Coiled shape w/ tubing


Fits in the kettle


Practicing with the fountain pump


Chiller all hooked up; ice water bath on the right

Transfer Batch No. 1

Date: November 4, 2007

At this point it's been 7 days since brewing.

Transferring from primary to secondary is pretty straightforward. The biggest concern here was keeping everything sanitary. I sanitized a new airlock, carboy (5 gal.), auto-siphon, tubing, funnel and thief for taking a sample. In the second photo you can see the auto-siphon taking the brew from the primary (above) to the secondary (below). Even though the auto-siphon has a protector on it, I generally hold it above the trub just to keep it from getting a little clogged and slowing down. After the transfer, you need to clean, clean and clean.

Also, it came to my attention later that not all homebrewers use an auto-siphon. This might be one of the most important items my beer kit came with - seriously!!

In this batch, I dry hopped 1.0 oz. of chinook hops in pellet form. Later one I would dry hop a beer using leafs hops. Long story short, dry hop with pellets!!


Krausen left overs


Transferring - gravity is key!!


Almost empty primary - plenty of trub


Dry hopped (pellets)


Hops starting to dissolve

First Brew Day - Thoughts

Some thoughts from my first day:
  1. Homebrewing rocks!!!
  2. Love the smells of the hops, boiling wort, etc.
  3. LME is sludge - must heat up to make pouring easier
  4. With my 8-gallon kettle no reason to do partial boil
  5. Chilling took a long time w/ 1.5 gals, can't imagine how long for 5
  6. Must make/buy a wort chiller
  7. Don't get concerned if airlock activity takes a while
  8. When's the next one?

Additional equipment to pick up:
  1. Bottles (should have saved more!!)
  2. Big spoon for stirring extracts
  3. Floating thermometer
  4. More ingredients!!
  5. Wort Chiller material


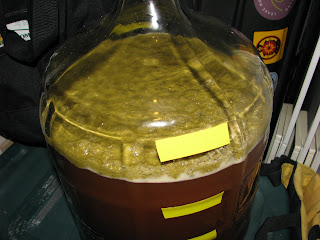
Bubbling away after 24 hours


Check out that krausen!!


Blow tube rigged for overflow

Batch No. 1 - Clean Sweep IPA

Clean Sweep IPA

Brewed - October 28, 2007

Style - IPA
Source - Northern Brewer Kit / Chinook IPA

Ingredients:
  • 6.0 lbs. Pilsen LME
  • 1.0 lbs. Pilsen DME
  • 0.75 lbs. Dingeman's Caramel Pils
  • 0.25 lbs. Briess Caramel 120
  • 1.0 oz. Chinook (60)
  • 0.5 oz. Chinook (10)
  • 0.5 oz. Chinook (1)
  • 1.0 oz. Chinook (dry hop)
  • Wyeast #1056 American Ale
OG - 1.056
Primary - 7 days
Secondary - 21 days

Bottled - November 23, 2007

FG - 1.020
Attenuation - 65%
ABV - 4.72%

Notes:
- Partial boil (1.5 gallons)
- Steep grains at 170° for 15 minutes
- 60 minute boil

First day homebrewing!!!

Date: October 28, 2007

So my first day homebrewing was also the same day the Red Sox completed a World Series sweep of the Rockies and I finished just in time to catch the game.

The temps were chilly on this fall morning, so I cranked heat for approx. 70 degree temp before starting yeast pack at 9:30 am; the inner pack seemed hard to break at first; process seemed slow to start, so shook package more and heard “crackling” inside

I PM’ed my friend Sharon w/ some final questions that now seem kind of silly:

  1. Started my yeast pack a little while ago, but my place was really cold this morning and had to crank the heat first (says must be 70 degrees)....package hasn't swelled at all yet and could be a while before i can start boiling...should I be concerned?
  2. My kit came with some specialty grains (that i need to smash up a little), malt syrup, DME powder and hops i need to put at 4 different times....the final being dry hop (secondary ferm)....the hops are very small pellets...do those just dissolve?
  3. After pouring in the yeast, should you agitate the wort in the primary before letting it sit for fermentation?
  4. I haven't seen anything in my instructions about straining...maybe b/c of my type of kit and small hop pellets, but do you recommend straining anyway, especially from kettle to primary? all I have is a strainer I use for pasta, etc.
  5. Is it ok to sanitize a bunch of stuff (like what i need for today) all at once and let dry on a towel, or does sitting around for a bit still mess them up again?
  6. When transferring from primary to secondary, no air should be getting into the secondary? my siphon hose doesn't fit into the rubber stopper so the top of the secondary would be open to the air during the whole transfer
She was helpful with answers, but also words of wisdom to relax and not worry so much.

Time to start!!!!

  1. 12:00 pm - Place specialty grains into plastic bag and crush; pour grains into mesh sock; some grains escape
  2. 12:15 pm – Pour 1.5 gallons into kettle and begin to cook
  3. 12:19 pm – Start to steep specialty grains
  4. 12:32 pm – water temp reaches 170°; remove grains (13 minutes)
  5. Prep extracts
  6. 12:50 pm – water reaches boil (35 minutes)
  7. Remove kettle from stove
  8. Add liquid extract (like sludge – next time soak in hot water first)
  9. Add DME (poured too fast and formed big clumps)
  10. 1:00 pm – extracts all mixed in; cloudy brown
  11. 1:03 pm – Kettle put back on burner
  12. 1:25 pm – Wort boiling; time for hops; 1.0 oz. chinook @ 60 min.
  13. 2:15 pm - 0.5 oz. chinook hops @ 10 min.
  14. 2:24 pm - 0.5 oz. chinook hops @ 1 min.
  15. lots of foaming and lovely hop aromas; prep cooling tub
  16. 2:25 pm – Boil is complete; place wort in cooling tub (some ice)
  17. While wort cools, all equipment is sanitized
  18. 3:10 pm – wort is under 80° (45 minutes)
  19. The next steps happen in a flurry
  20. Fill primary carboy w/ 3 gallons
  21. Dump wort into carboy using funnel
  22. Fill up to 5 gallon mark with water
  23. Sanitize wort package and scissors
  24. Pitch yeast (pour down funnel – ok?)
  25. Stopper with lock (and water)
  26. Very little trub left in kettle
  27. Clean up and done by 4:45 pm


Steeping the grains


LME/DME mixed in


Boiling away after first hop addition


Trying to chill wort


Sanitized equipment


All finished

Prep for first brew day

Date: October 27, 2007

This biggest thing on this day was just getting used to some of the equipment and trying to figure out positions, etc. I didn't want to be totally blind on brew day.
  1. For my water I decided to pick up a 5-gallon water jug and then get it filled at local markets. I don't necessarily think anything is wrong with my tap water, but figured this was a good way to keep it consistent. Not sure when or if I'll get into the pH testing, etc.
  2. Unpacked stater kit, checked contents
  3. Filled up each carboy and marked gallon levels w/ tape
  4. Practiced siphoning
  5. Cleaned/sanitized some equipment from shipping, etc.
  6. Pickup up big plastic tub for cooling the wort
  7. Reviewed instructions and beer ingredients


Saturday, April 25, 2009

And so it began....

For many years I wanted to get into homebrewing and in the fall of 2007 it became a reality. With a handful of gift certificates, I picked up a Deluxe Starter Kit from Northern Brewers, an 8-gallon brew kettle and a few extract recipe kits. I looked at many options before choosing this kit and retailer, and IMO it was the best value and I'm glad I picked up the bigger kit w/ glass carboys, etc.

Similar to when I got into telemark skiing, I jumped right in w/ my investment without any previous experience or knowledge. Sure I drank and loved beer and had even taken a few simple brewery tours, but I didn't know anything about the process. I picked The Complete Joy of Homebrewing by Charlie Papazian and admittedly was overwhelmed by some of the detail, esp. ones related to sanatizing. Getting into something new can often cause anxiety and I certainly was anxious in the days leading up to my first batch. I took lots of notes to help remember the procedure, read blogs and chatboards and consulted a few folks I knew had homebrewed before. It all seemed like a big to-do, but with just a little prep work and focus, homebrewing really is quite easy.

So, over the next 1.5 years I have brewed 15 batches and I'd have to say that brewing your own beer is a pretty rocking hobby. It's fun, challenging, scientific, creative and the options are endless. No matter what you think you know, there is always more to learn and different things to try.

I intend to get this blog up and running with all my previous batch details, photos, general brewing procedure and then keep it current with aspects of my record keeping that are lacking in my notebook - mainly tasting notes, research and thoughts as I continue to expand as a homebrewer. Thanks for reading!!